Part 3
Here we dissect the CellML 1.0 model developed in Tutorial 2 into two separate files and use the CellML 1.1 import construct to connect them together.
The architecture of the files will be as follows:

At the time of writing COR does not support CellML 1.1 files, so we will edit the files in a text editor, and will then run the resulting model in OpenCell instead.
Creating the 'sub' file
Create a new Cellml file, using just the header and <model> tag (you can copy from the Cellml file developed in Tutorial 2. It should look something like this:
<?xml version="1.0" encoding="utf-8"?>
<!--
This CellML file was generated on 27/05/2008 at 11:02:59 at a.m. using:
COR (0.9.31.955)
Copyright 2002-2008 Dr Alan Garny
http://COR.physiol.ox.ac.uk/ - COR@physiol.ox.ac.uk
CellML 1.0 was used to generate this model
http://www.CellML.org/
-->
<model
    name="submodel"
    cmeta:id="submodel"
    xmlns="http://www.cellml.org/cellml/1.0#"
    xmlns:cellml="http://www.cellml.org/cellml/1.0#"
    xmlns:cmeta="http://www.cellml.org/metadata/1.0#">
</model>
We need to copy the <component> tag (and its contents) for the 'firstComponent' and paste it into the inside of the <model> tag. We also need to copy across all the unit definitions for the units used in the 'firstComponent' (which is all of the units defined in Tutorial 2 except millivolt). This is now a standalone CellML 1.0 model much like that developed in Tutorial 1. It has the additional feature of 'C' being defined with a public interface of out, which we use to connect this model to our main model.
Save it as 'tutorial3sub.cellml'.
Creating the 'main' file
The main file is a copy of the file from Tutorial 2, with the following changes:
-
Strip out the component 'firstComponent', as this is now being imported from the 'sub' file.
-
Remove any units that aren't used by 'secondComponent'. The units left should be 'uM' and 'millivolt'.
Save it as 'tutorial3main.cellml'.
At this point this file comprises the 'secondComponent' with a now-broken link (via <map>) to the 'firstComponent'. To reconnect that link we need to import the 'firstComponent' from the 'sub' file.
Importing is a CellML 1.1 construct. To upgrade the 'main' file to CellML 1.1, adjust the header so that the following two references in the <model> tag:
xmlns="http://www.cellml.org/cellml/1.0#" xmlns:cellml="http://www.cellml.org/cellml/1.0#"
reference CellML 1.1 rather than 1.0 thus:
xmlns="http://www.cellml.org/cellml/1.1#" xmlns:cellml="http://www.cellml.org/cellml/1.1#"
We also add a xlink namespace reference to the <model> tag:
xmlns:xlink="http://www.w3.org/1999/xlink"
which allows us to import the 'sub' file via an import tag:
<import xlink:href="tutorial3sub.cellml">
  <component name="intracellular" component_ref="firstComponent" />
</import>
Here 'name' is the name of the component as this file sees it. I've called that 'intracellular'. The 'component_ref' is the name that we gave the component in the 'tutorial3sub.cellml' file. Note - the 'name' could also have been 'firstComponent' if desired.
Once imported, the components can be connected together by a <map> tag, only referencing the name of the components as the current file sees them:
<connection xmlns="http://www.cellml.org/cellml/1.0#">
  <map_components component_1="intracellular" component_2="secondComponent"/>
  <map_variables variable_1="C" variable_2="C"/>
</connection>
Simulating the model in OpenCell
First download and install OpenCell if it is not already available on your machine. Run it, and use File/Open to load the 'tutorial3main.cellml'. If everything is defined correctly, the 'tutorial3sub.cellml' file will be automatically imported

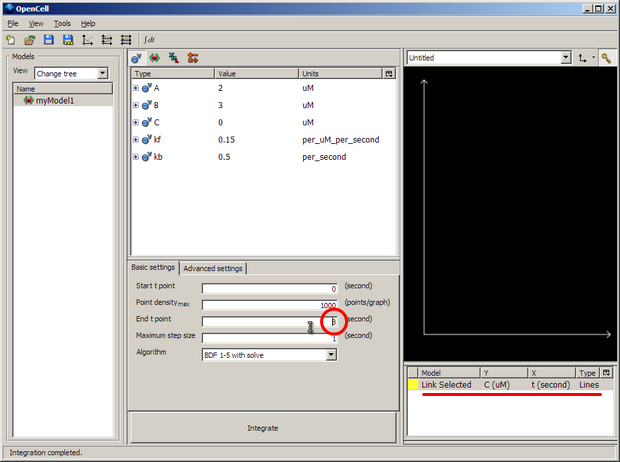
Change the 'End t point' (ringed in red above) to 8 seconds to match our COR simulation duration.
Right click on the white pane under the black graph pane and select 'New Trace' to bring up a selection - as shown underlined in red in the image above. This is where we define a graph to view the output from the model simulation.
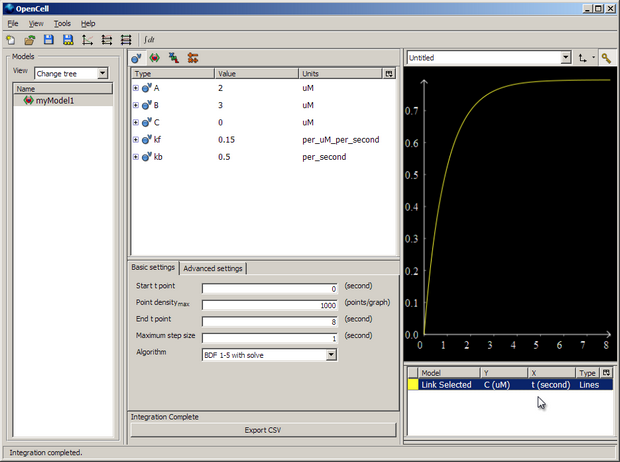
Left click on the area underneath the 'Y' to select 'secondComponent'->'V'. Click on the area underneath the 'X' to select 'firstComponent'->'t'. If you click the coloured square (yellow in the example above) you can change the colour of the line if you like.
Then push the big 'Integrate' button in the bottom middle of the window, and membrane voltage 'V' will be plotted against time 't' for 8 seconds.

You can then export the results of the simulation to a .csv file with 'Export CSV'.
Here our model is varying V based on the concentration of C, the model for which is held in another file.
For more information on operating OpenCell, see the Manual or Tutorial under the Help menu.
That concludes Tutorial 3. All the cellml files described in this document should be included in the ZIP file with this document.

